This tutorial shows how to create rectangular revision cloud in AutoCAD step by step. Click Home tab Draw panel Revision Cloud drop-down.
How To Draw Cloud Revision In Autocad 2016 2018 2019 Youtube
You can also create revision cloud from classic Drawing toolbar - Mark cloud button by default.
. To create the revision cloud do one of the following. Press Enter to keep the current direction of the arcs. Click at rectangular from the command line options and then click at two points in the drawing to make the rectangle.
How do you make a bricscad cloud. Press Enter at any time to stop drawing the revision cloud. The Draw Order option controls what displays on top when objects overlap.
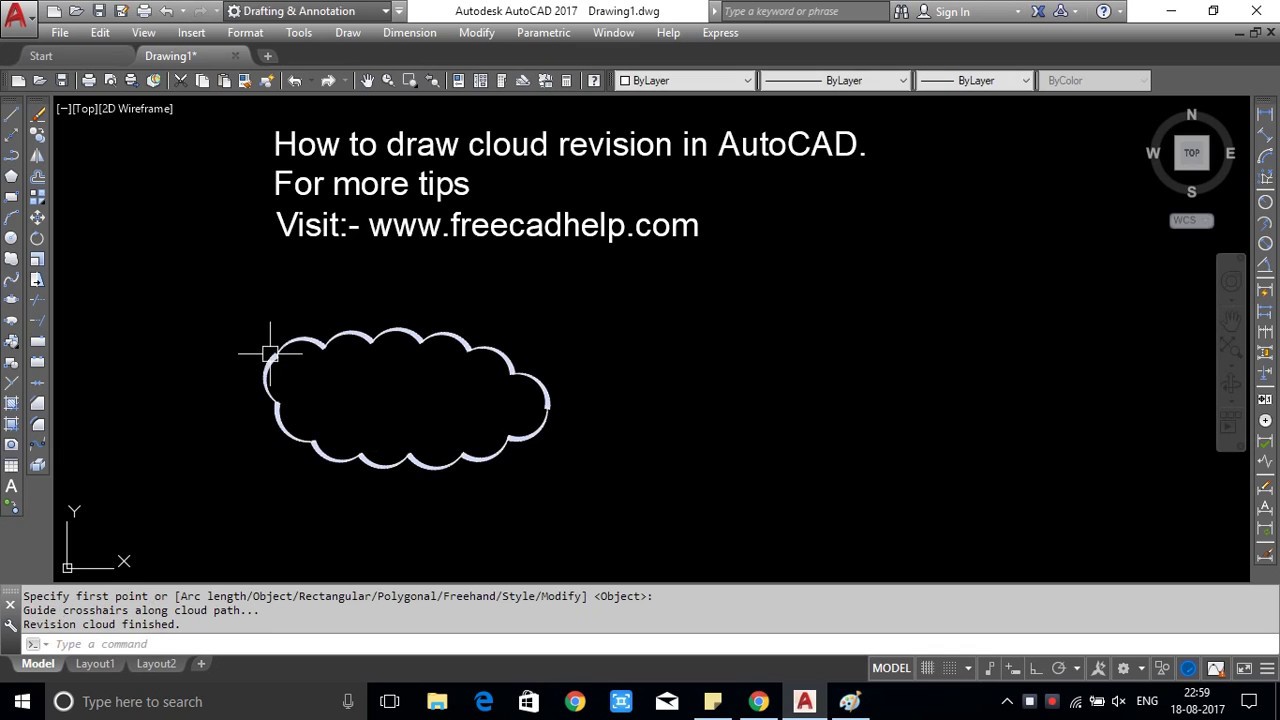
A revision cloud will be made in the drawing area as shown in the image below. DisclaimersEditing the descriptions on your existing videos may affect their placement in search engines resulting in a drop of views for several weeks unt. To close the.
Click Home tab Draw panel Revision Cloud drop-down Freehand. Using the revision cloud button on the DRAW toolbar I draw the clouds in paperspace like I always have. How do you make a rectangular cloud in Autocad.
To leave the command without creating the revision cloud choose Cancel in the prompt menu or press the Esc key. Optional To see more information about the point cloud such as size intensity and colors click Show Details. This arrangement optimizes the speed of file operations.
When you use cloud storage on a desktop computer Dropbox Box and Microsoft OneDrive all interact with a local cache of your drawing files on your computer. Run the command again select the. Press Enter to keep the current direction of the arcs.
Create a Freehand Revision Cloud. In the drawing area right-click and choose Object. How do I draw a cloud in AutoCAD 2018.
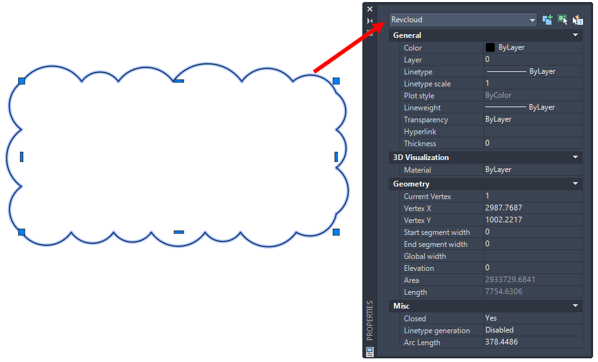
Select a circle ellipse polyline or spline that you want to convert to a revision cloud. In the drawing area right-click and choose Object. To reverse the direction type Y or choose Yes in the prompt menu.
However its only present if you select an object by which to. Click the Revision Cloud tool button on the Draw toolbar. In this session you will learndrawing Revision Cloud and options.
In the drawing area right-click and choose Object. Click Home tab Draw panel Revision Cloud drop-down. By default the geometry is created on a plane coincident with the section plane.
Select a circle ellipse polyline or spline that you want to convert to a revision cloud. You can draw it from Home tab of tool ribbon in Drawing Tools group nested buttons for how to build cloud in AutoCAD. The arcs of my clouds now flip back and forth so that they.
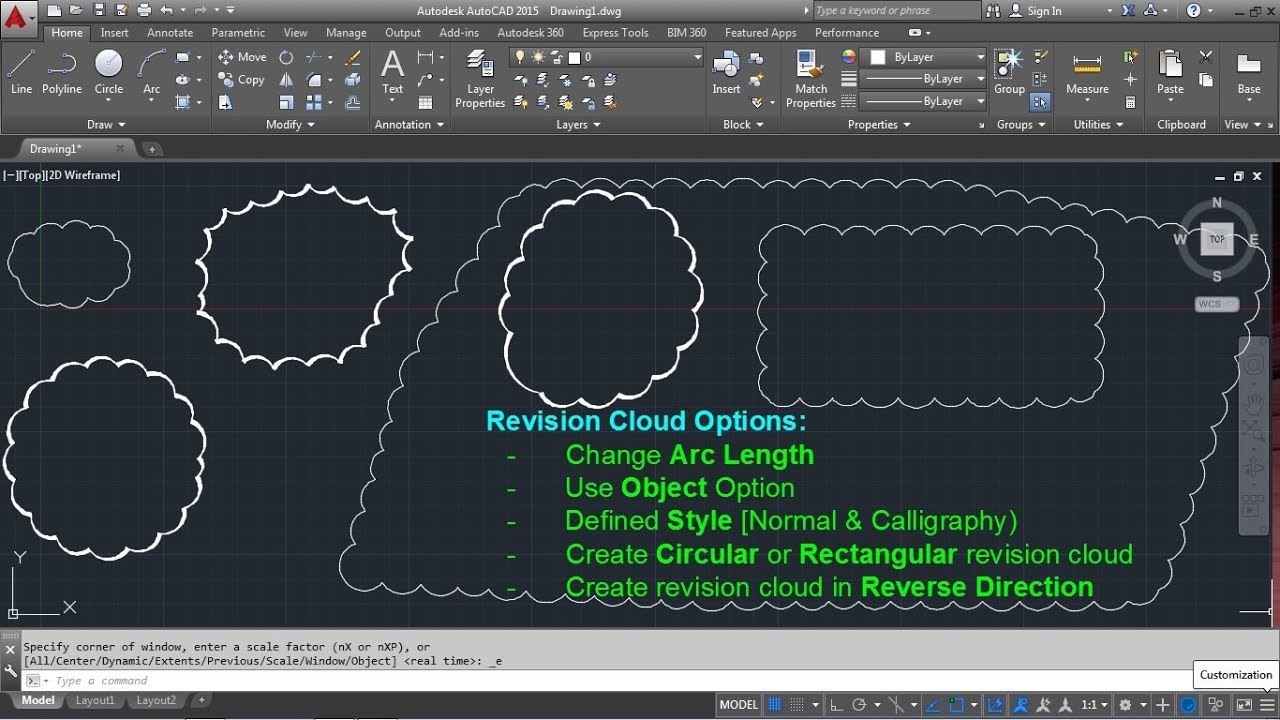
You can define the geometry that you want to extract the layer on which it is created on the color of the resulting 2D lines or polylines the width of the polylines and the. To create a simple revision cloud type REVCLOUD on the command line and press enter. Guide the crosshairs along the cloud path.
A collegue of mine used to invert revision clouds using AutoCAD LT 2000. How do you add a revision to a triangle. Theres an interrelationship between what AutoCAD-based products control and what cloud providers control.
Object option select the existing backwards cloud and when asked to. You can click pick points along the path if you want to vary the size of the arcs. We are now on LT2006 but are unable to invert the rev cloud every time we get back to the start point the cloud defaults to concave arcs.
Select a circle ellipse polyline or spline that you want to convert to a revision cloud. You can build revision cloud from menu bar item Drawing - Cloud row. 07-16-2008 0824 PM.
Optional If both your drawing file and the point cloud file contain geolocation data using the same coordinate system click the Use geographic location check box to locate the point cloud on the drawing. Although were in Architecture 2012 Ive gotten rid of the Windows ribbons and used MENULOAD to bring back the toolbars I am most efficient with. Click Home tab Draw panel Revision Cloud drop-down.
AutoCAD Productivity Training Webinar Available Now. Press Enter to keep the current direction of the arcs. Creating a simple Revision cloud.
Type revision cloud in the command bar then press Enter. How do I change the scale of Revcloud in AutoCAD. Choose Revision Cloud in the Draw menu.
So this is what you do. In the drawing area right-click and choose Object. Click Home tab Draw panel Revision Cloud drop-down.
Select a circle ellipse polyline or spline that you want to convert to a revision cloud. Revision Clouds turning inside-out. To create a simple revision cloud type REVCLOUD on the command line and press enter.
Click at rectangular from the command line options and then click at two points in the drawing to make the rectangle. To accept the revision cloud right click. AutoCAD Revision Cloud Rectangle AutoCAD Rectangular Revision Cloud.
The PCEXTRACTSECTION command identifies the underlying 2D geometry in the point cloud and creates a 2D line drawing. Revision Clouds Revision clouds surround the differences between the current and compared drawings grouping them into change sets. When i say inverted i mean we want the arcs to be convex.
This is useful if there is an element on your drawing not quite finished. Change sets are objects in close enough proximity to be included in a single revision cloud which is determined automatically. A revision cloud will be made in the drawing area as shown in the image below.

Revision Clouds Revcloud Command In Autocad

How To Make Revision Cloud In Autocad Youtube

How To Draw Revision Cloud In Auto Cad In Urdu Hindi Youtube
Autocad 2021 Revision Cloud Enhancements Cadline Community

Autocad Revision Cloud Rectangle Autocad Rectangular Revision Cloud Youtube
Autocad Revision Cloud Command Tutorial Complete Arc Length Inside Out Settings Scale Line Width Youtube

Autocad 2016 Revision Cloud Youtube

Autocad Tutorial How To Draw Revision Cloud Youtube
0 comments
Post a Comment